
Blackjack Tips Information & Video Source:
Product links:
Crack Filler: https://amzn.to/32owoTo
Putty Knife: https://amzn.to/3aNk4j4
Steel Brush: https://amzn.to/2QhN6xV
Work Gloves: https://amzn.to/3hnsD6R
Safety Glasses: https://amzn.to/3gtHPhC
Soft Utility Brush: https://amzn.to/2Qg8d3x
Weed Control Blow Torch: https://amzn.to/2CRSBQV
Air Compressor Kit: https://amzn.to/2YmgaJ9
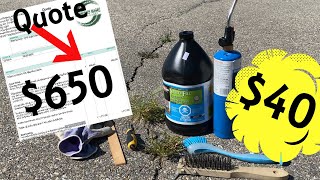
It’s important to reseal any cracks in your asphalt driveway to prevent further damage from vegetation, like you see here in my driveway. It’s also important to fill these cracks as water will get in here and slowly erode the base aggregate. Once winter comes, any water that made it ways through the cracks and under the pad, the resulting ice could cause pieces of the driveway to break away and the surface could even start to heave or sink. I’ll be getting my driveway professionally sealed in a few days, so I decided to save some money and do this part of the job myself. The pros quoted me $650, but I’ll be doing it for $40.
In today’s demonstration, I’ll be using the following:
1. A flat head screwdriver or similar tool to help loosen any packed soil, debris, or weak pieces of rock from the asphalt. This will be your first line of attack.
2. A steel brush to remove any packed in soil or dirt and to help clean up the cracked area.
3. A soft brush to sweep away any material in the crack or around my working area.
4. A blow torch to kill any vegetation I am unable to successfully remove by hand.
5. A paint-stick to help smoothen out the filter material once it’s poured into the cracks. A 2” or 4” putty knife would work equally well.
6. An air compressor to blow out any dead grass or unwanted particles from within the crack. This is probably the most useful tool once the debris and rocks in the crack are loosened with the screwdriver.
7. You’re going to want safety glasses because that compressor can really make the sand and dirt fly everywhere.
8. Also, gloves are important, so don’t forget those.
9. Lastly, the fill that I am using today is called Speed-Fill by Black Jack. It comes in a container about 1 gallon in size or 3.4 liters. It costs about $20 at my local hardware store. For my project, I will need 2. I’ll add links to similar products from Amazon in the description below. The one I am using, works best on warmer days around 16 degrees Celsius or 61F, or warmer. Smaller cracks will dry and can be driven on within 2 hours while larger cracks will require 5-6 hours.
The idea is to remove any weeds or moss that could be growing out of the cracks. That flathead screwdriver comes in handy for loosening up the root area and pulling it out. It can also be used to scrape along the crack to loosen up any debris. The idea is to clear out the foreign material so the filler liquid has maximum surface area on each side of the crack to made full contact and seal up that area.
I’ll give it a little blast with the torch to ensure the root of that dandelion is dead. Same thing for this next weed. I don’t want them coming back in a week or 2. There we go; the screwdriver and the brush really got this crack cleanup up very nice. Let me run over that area with the steel brush ensuring there are no loose rocks.
Now, for the best tool of all, the air compressor. Let’s blast away any remaining debris like dead grass, leaves, seeds and small rocks.
The crack is now ready for the filler. Make sure to shake the filler bottle for 3-4 minutes. When you buy this stuff, you can feel the liquid in the top portion of the jug and sludge in the bottom half. It needs to be mixed very well, or it will be too watery with chunks of sludge.
Opening the jug is a little tricky. Have a piece of paper towel on hand. Remove the cover and place your finger in the tip so it can be easily removed without touching the filler substance on the tip. Clean it up with the paper towel and attach it to the top of the jug. Now cut the tip about a half inch down at a 45-degree angle. Pour the filler liquid into the crack. I like to use that stir stick to broaden the coverage area on each side of the crack to ensure I have a good seal. For larger cracks, the filler will sink and it could even split while it’s drying over the next hour. This is totally normal as the liquid is working its way into the depths of the crack. Reapply a second coating within an hour or 2 to top up the crack. For larger cracks, adding a little sand to the crack will help save on filler solution. I like to top them up about half way so I don’t use as much filler and I still get a large enough surface area on the crack’s sidewalls.
On this smaller crack, it’s quite simple. After having cleaned it out, the filler is applied and then spread out for surface coverage.
Once dried, the filler is nice and durable and even on this hot day, a day later, it’s totally dried and hard to the touch. The driveway is now ready to be professionally sealed and I saved myself a handful of cash.
Source: YouTube


You blew out the debris in the cracks and on the deep cracks you filled it with sand??? They make a product that’s thicker and you spread it into the cracks with a trowel. It’s basically the same stuff just a higher sand to bonding agent ratio. Should make for a better repair.
6:09 Those cracks are not filled enough to make them disappear. I had the same problem with a different brand filler but probably the same stuff. My other problem was there were so many little micro-fine cracks I would probably need to coat as much as 25% of the driveway with filler, twice. Right now I'm looking for someone to just scrape up the entire driveway and repave it.
I also discovered my 2,500 psi pressure washer with the 0 red tip worked pretty well for cleaning out the plants in the cracks. It sure is much easier and faster than doing it by hand. I was afraid it would damage the asphalt but it seems that particular pressure washer is perfect for that particular job.
Well detailed video. One recommendation: should have filled crack with coarse sand to fill void especially where there has been water intrusion. Also, the driveway appears ready for re-coating; a messy job. I used the thick stuff with filler.
Very nice, thank you
HOW LONG DOES THE FILLER LAST IT'S BEEN 2 YEARS BEFORE YOU HAVE TO RESEAL??
40 bucks for crack? Noice!
I feel like blowing away the debris wasn't needed if you still need to fill in gaps with sand.
Excellent presentation. What about storage if you only use a portion of the gallon?
Getting your driveway sealed is like putting lipstick on a pig, waste of time and money.
I have tried many of these crack fillers. It's more expensive, but for my money, I used 100% black silicone on my existing driveway cracks. Three years now, and not one has opened up or started a new crack. And this is Northeast weather.